🎯 Guide to Connecting Microsoft Outlook with UpBrains AI
Integrate Microsoft Outlook to automate workflows triggered by incoming emails or newly created categories. Perfect for support teams, lead management, or inbox automation.
You can get started by choosing one of Microsoft Outlook's Agent Templates at UpBrains AI to continue this guide.
🔵 Step 1: Select Microsoft Outlook as the Trigger
When setting up your Agent:
Under Trigger Type, choose Microsoft Outlook.
Then select one of the available trigger events:
✅ Trigger Options:
Trigger | Description |
|---|---|
New Message | Triggers when a new email is received in your Outlook inbox |
New Category | Triggers when a new email category is created |
🔵 Step 2: Create or Select a Connection
If you already have a connection:
Choose it from the Connection dropdown.
To create a new Microsoft Outlook connection:
Click on New Connection, and fill out the form:
Field | Example | Description |
|---|---|---|
Name | microsoft-outlook | Unique name for your Outlook connection |
⚠️ If the name is already used, choose a different one.
🔵 Step 3: Trigger Configuration
If you selected New Message as the trigger:
Field | Value |
|---|---|
Connection | Required |
Token Type | None (Default) |
Live URL | https://agents.upbrains.ai/v1/webhooks/[ID] |
Test URL | https://agents.upbrains.ai/v1/webhooks/[ID]/test |
Shared | Correlate all runs triggered by the same email thread |
No Data Retention | Enable if you don’t want to store agent run session data after execution |
Step 4: Test the Trigger
In UpBrains AI, press “Test Trigger” from the Test Trigger area. It should be put in the test mode.
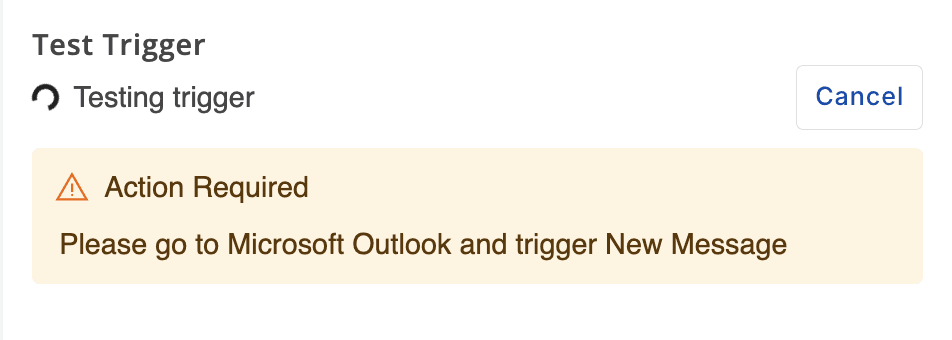
Send a test email to the selected inbox in your Outlook.
Wait up to 30 seconds. You should see a JSON object in the Test Trigger area containing:
Email body
Metadata (sender, subject, tags)
Information and links of attachments (if any)

🤖 Step 5: Build & Validate Your Flow
Use the email payload from Microsoft Outlook to build your automation. You may start from one of available Agent Templates with a Front Trigger. Alternatively, you can build your own custom agent flow. Visit How to Create your First AI Agent guide for more information. In a custom agent flow, you can:
Use AI steps like:
📄 Document OCR
🧠 Open AI for intent or summarization
Information extractors from the message body and attachments
Test each step with real data using Test Step.
Once all steps work correctly, Publish the Agent.
Processing Email Attachments
The best practice for processing attachments of an email is use a Loop element to process all attachments of an email:
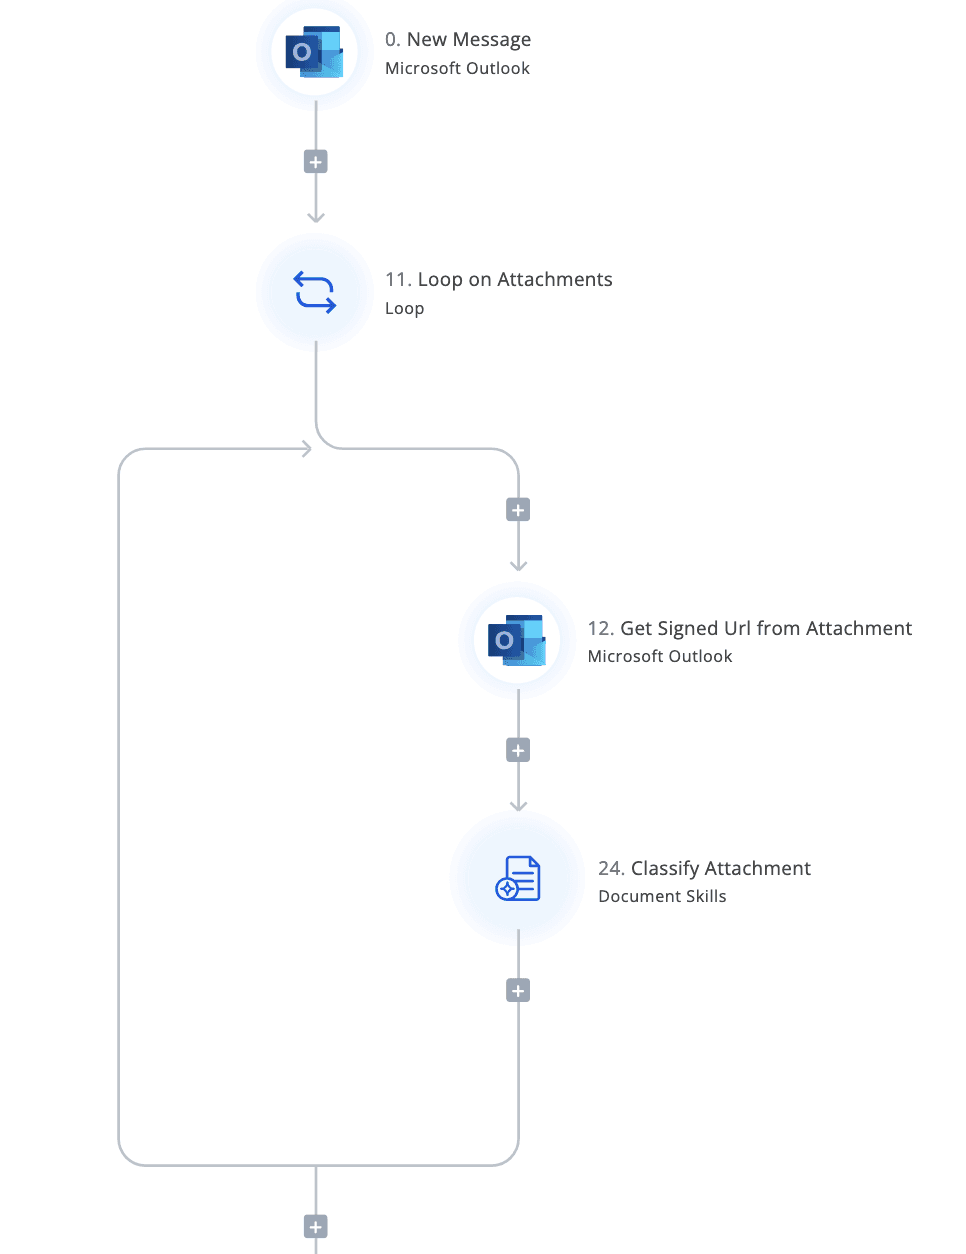
Creating Signed URLs for Attachments
The attachment links that are included in the trigger need an access token to download and process the attached file. On the other hand, next steps in the agent flow that process files (e.g., Classify Attachment or Extract Information from Document Skills tool) need URLs of the files to be accessible without needing to deal with credentials.
The solution is to use an action called “Get Signed URL from Attachment” action from the Microsoft Outlook tool. This action will get the attachment URL (the ‘contentURL’ of the attachment object) and the associated File Name and build a signedURL. This signed URL can be fed to the File URL field of the next steps in the agent flow to process the attachment.
🚀 Step 6: Go Live
When you are ready and tested every step of your flow, Publish your agent flow. This will create the necessary event subscription entries in Microsoft Outlook for this particular Agent so that it can receive subscribed event information that meet the trigger conditions.
🎉 Done! Your Microsoft Outlook Inbox inbox is now integrated with UpBrains AI.
Testing the Live Connection: To test your live settings, now create an event (sending an email to the inbox connected to UpBrains AI) that meets the trigger conditions. To ensure this works correctly, in the Admin Workspace under Agents click on Sessions. You should see a list of the latest agent runs (based on your Front rule’s triggers) and their status. If you click on any of the agent run records, you should be able to see the execution details of your agent automation flow and the status of each step. If they are processed successfully, you are done! Congratulations!
✅ Summary
With Microsoft Outlook integration, UpBrains AI can:
Extract key information from messages or attachments
Automatically respond to incoming emails
Classify and organize emails into categories
Trigger custom workflows from specific messages based on content
Power intelligent routing or task creation in your stack
🎯 Guide to Connecting Microsoft Outlook with UpBrains AI
Integrate Microsoft Outlook to automate workflows triggered by incoming emails or newly created categories. Perfect for support teams, lead management, or inbox automation.
You can get started by choosing one of Microsoft Outlook's Agent Templates at UpBrains AI to continue this guide.
🔵 Step 1: Select Microsoft Outlook as the Trigger
When setting up your Agent:
Under Trigger Type, choose Microsoft Outlook.
Then select one of the available trigger events:
✅ Trigger Options:
Trigger | Description |
|---|---|
New Message | Triggers when a new email is received in your Outlook inbox |
New Category | Triggers when a new email category is created |
🔵 Step 2: Create or Select a Connection
If you already have a connection:
Choose it from the Connection dropdown.
To create a new Microsoft Outlook connection:
Click on New Connection, and fill out the form:
Field | Example | Description |
|---|---|---|
Name | microsoft-outlook | Unique name for your Outlook connection |
⚠️ If the name is already used, choose a different one.
🔵 Step 3: Trigger Configuration
If you selected New Message as the trigger:
Field | Value |
|---|---|
Connection | Required |
Token Type | None (Default) |
Live URL | https://agents.upbrains.ai/v1/webhooks/[ID] |
Test URL | https://agents.upbrains.ai/v1/webhooks/[ID]/test |
Shared | Correlate all runs triggered by the same email thread |
No Data Retention | Enable if you don’t want to store agent run session data after execution |
Step 4: Test the Trigger
In UpBrains AI, press “Test Trigger” from the Test Trigger area. It should be put in the test mode.
Send a test email to the selected inbox in your Outlook.
Wait up to 30 seconds. You should see a JSON object in the Test Trigger area containing:
Email body
Metadata (sender, subject, tags)
Information and links of attachments (if any)
🤖 Step 5: Build & Validate Your Flow
Use the email payload from Microsoft Outlook to build your automation. You may start from one of available Agent Templates with a Front Trigger. Alternatively, you can build your own custom agent flow. Visit How to Create your First AI Agent guide for more information. In a custom agent flow, you can:
Use AI steps like:
📄 Document OCR
🧠 Open AI for intent or summarization
Information extractors from the message body and attachments
Test each step with real data using Test Step.
Once all steps work correctly, Publish the Agent.
Processing Email Attachments
The best practice for processing attachments of an email is use a Loop element to process all attachments of an email:
Creating Signed URLs for Attachments
The attachment links that are included in the trigger need an access token to download and process the attached file. On the other hand, next steps in the agent flow that process files (e.g., Classify Attachment or Extract Information from Document Skills tool) need URLs of the files to be accessible without needing to deal with credentials.
The solution is to use an action called “Get Signed URL from Attachment” action from the Microsoft Outlook tool. This action will get the attachment URL (the ‘contentURL’ of the attachment object) and the associated File Name and build a signedURL. This signed URL can be fed to the File URL field of the next steps in the agent flow to process the attachment.
🚀 Step 6: Go Live
When you are ready and tested every step of your flow, Publish your agent flow. This will create the necessary event subscription entries in Microsoft Outlook for this particular Agent so that it can receive subscribed event information that meet the trigger conditions.
🎉 Done! Your Microsoft Outlook Inbox inbox is now integrated with UpBrains AI.
Testing the Live Connection: To test your live settings, now create an event (sending an email to the inbox connected to UpBrains AI) that meets the trigger conditions. To ensure this works correctly, in the Admin Workspace under Agents click on Sessions. You should see a list of the latest agent runs (based on your Front rule’s triggers) and their status. If you click on any of the agent run records, you should be able to see the execution details of your agent automation flow and the status of each step. If they are processed successfully, you are done! Congratulations!
✅ Summary
With Microsoft Outlook integration, UpBrains AI can:
Extract key information from messages or attachments
Automatically respond to incoming emails
Classify and organize emails into categories
Trigger custom workflows from specific messages based on content
Power intelligent routing or task creation in your stack
Creating your First AI Agent