DocuSign integration in UpBrains AI enables you to seamlessly automate document signing and management within your workflows. Whether you need to create envelopes, send documents for signature, use advanced AI capabilities on documents to classify, extract information, split and/or make decisions based on document content before sending them for approval or after, or automate complex document routing, this integration unlocks new levels of efficiency for your customer operations, finance, HR, and beyond.
UpBrains AI provides a no-code way to connect your DocuSign account and trigger e-signature actions as part of intelligent document workflows. To learn more about what’s possible with DocuSign and UpBrains, see the DocuSign Integration Overview.
Before proceeding, you should be familiar with creating AI Agents in UpBrains. If you’re new, please follow this guide first: Creating Your First AI Agent.
Step 1: Creating a DocuSign Connection
To use DocuSign actions in your Agent Flow, you must first connect your DocuSign account.
1. Either Go to Connections and add a new DocuSign connection or add Docusign into your Agent Flow.
Click on Docusign in the New Connection wizard (https://workflow.upbrainsai.com/connections).
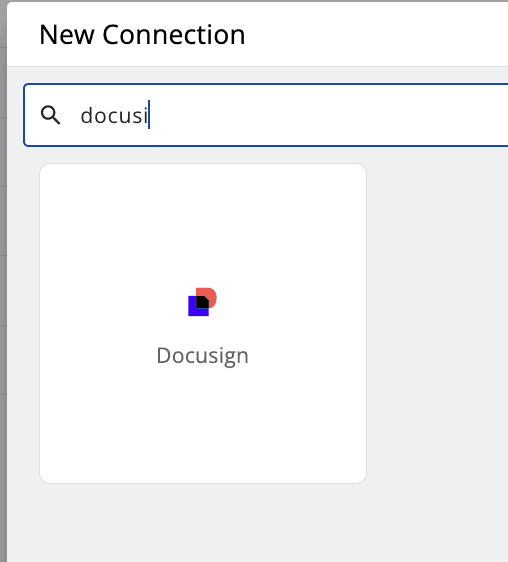
Or, add Docusign to your Agent Flow and from Connections area select New Connection option.
2. Enter your Docusign Account information:
Connection Name:
Give your connection a memorable name (e.g., "DocuSign-Connection").User ID:
You’ll need your DocuSign User ID.
Find your User ID in DocuSign’s Admin area by following this DocuSign Support Article.Authentication URL:
For production environments, use:
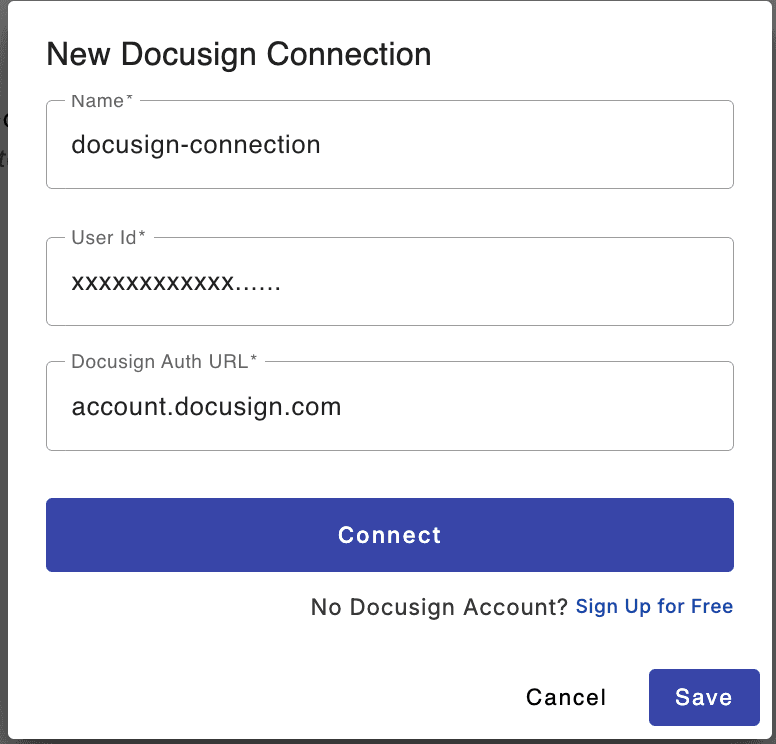
No Docusign Account?
On the connection page, click “Sign Up for Free” or visit create a free DocuSign account page to create your free account and then try UpBrains AI and DocuSign for free.
Click Connect.
You’ll be redirected to DocuSign to log in.
Important: Use an Admin account to grant UpBrains proper permissions for creating envelopes on your behalf.
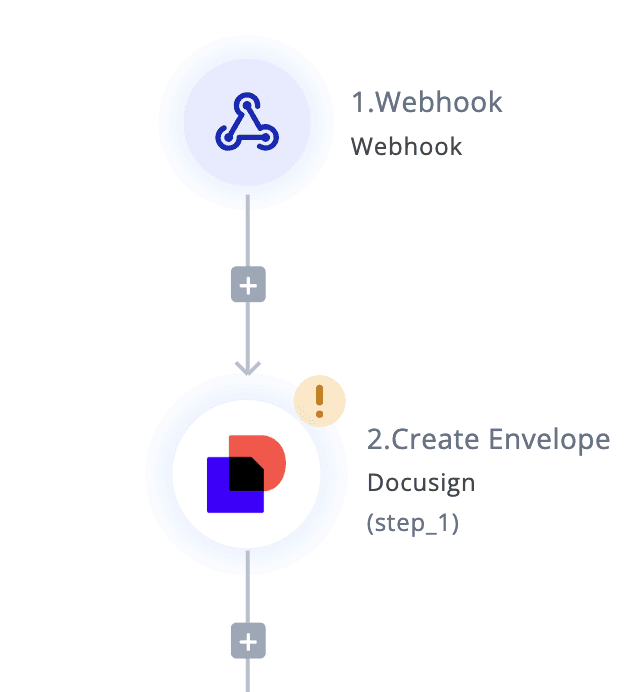
Step 2: Choose and Configure DocuSign Actions
Once your connection is established, you can add DocuSign actions to your Agent Flow. As the first step, add Docusign to your Agent Flow. UpBrains supports a variety of actions:
Supported DocuSign Actions:
Create Envelope (from Template)
Add Attachment to Existing Envelope
Create Envelope (Direct, from Document)
Create Envelope and Template
Send Envelope
Get Document Fields
Update Envelope Form Fields
Custom DocuSign API Call
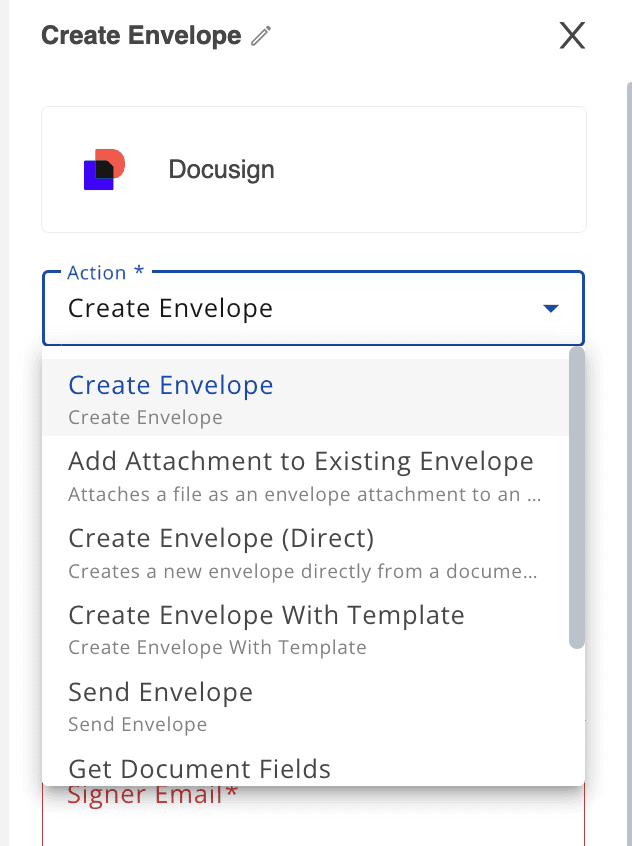
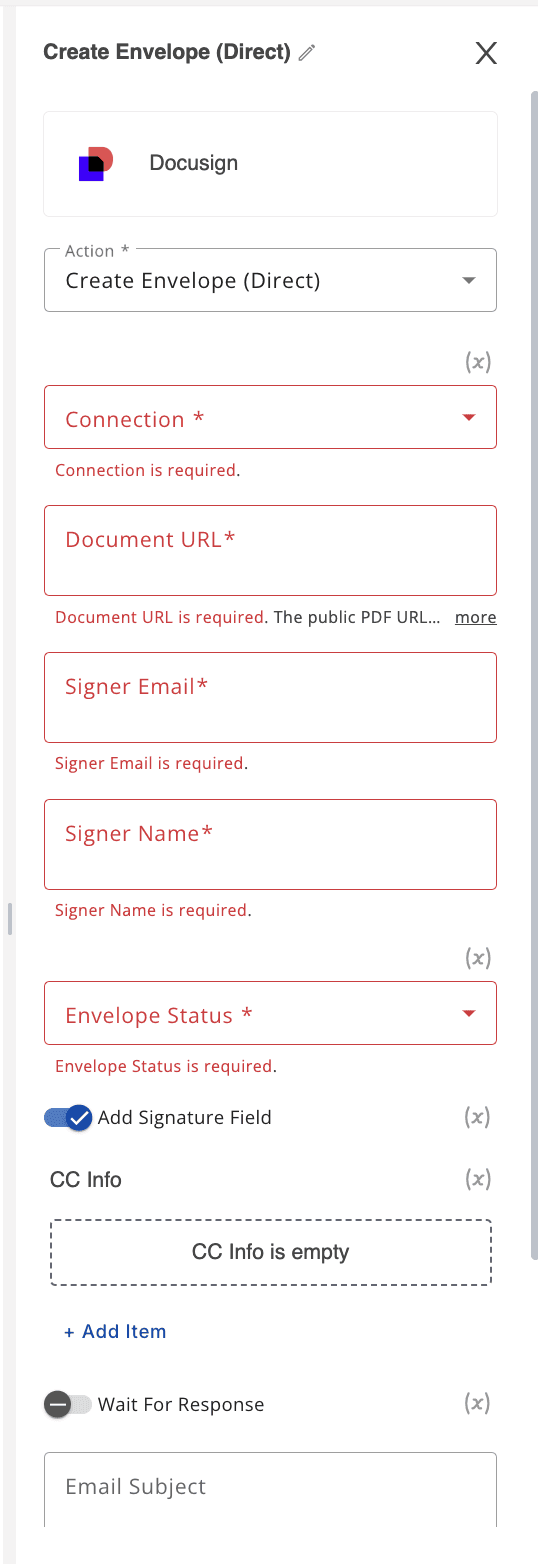
Example: Configuring “Create Envelope (Direct, from Document)”
This action lets you create and send an envelope with any document, without using a template.
Parameters:
Connection:
Select the DocuSign connection you created earlier.Document URL:
Provide the URL to the document to be signed. This can come from previous steps in your agent flow.Signer Email:
The recipient’s email address.Signer Name:
The name of the recipient.Envelope Status:
Choose one:Created – Creates a draft envelope in DocuSign (not sent). You can view and edit the envelop in Docusign and then send it manually.
Sent – Sends the envelope to the recipient immediately.
Add Signature Field:
Toggle ON to automatically place a signature field on the document.CC Info:
(Optional) Add email addresses to CC others on the envelope.Wait for Response:
Toggle ON to pause the agent flow until DocuSign notifies completion.Email Subject:
(Optional) Customize the email subject line for the envelope notification.
Step 3: Add Additional Steps (Optional)
After configuring your DocuSign step, you can extend your Agent Flow with additional AI-powered actions. For example:
Classify or extract data from the document before sending it for signature.
Automate follow-up steps after signature completion, such as sending signed documents to ERP, storing them in cloud storage, or extracting signed fields.
See the full list of available AI tools and actions here: Common Tools and Actions.
Example Agent Flow
Classify Incoming Document (AI Step)
Extract Key Data (AI Step)
Create Envelope (Direct, from Document) [DocuSign Action]
Wait for DocuSign Completion
Extract Signed Fields (AI Step or Docusign API)
Send to Internal System / Notify Team
Need More Help?
UpBrains AI makes it easy to automate your document signature workflows and more—with no code required!
Let me know if you need sample screenshots, video walkthroughs, or further customization for your specific use case!
DocuSign integration in UpBrains AI enables you to seamlessly automate document signing and management within your workflows. Whether you need to create envelopes, send documents for signature, use advanced AI capabilities on documents to classify, extract information, split and/or make decisions based on document content before sending them for approval or after, or automate complex document routing, this integration unlocks new levels of efficiency for your customer operations, finance, HR, and beyond.
UpBrains AI provides a no-code way to connect your DocuSign account and trigger e-signature actions as part of intelligent document workflows. To learn more about what’s possible with DocuSign and UpBrains, see the DocuSign Integration Overview.
Before proceeding, you should be familiar with creating AI Agents in UpBrains. If you’re new, please follow this guide first: Creating Your First AI Agent.
Step 1: Creating a DocuSign Connection
To use DocuSign actions in your Agent Flow, you must first connect your DocuSign account.
1. Either Go to Connections and add a new DocuSign connection or add Docusign into your Agent Flow.
Click on Docusign in the New Connection wizard (https://workflow.upbrainsai.com/connections).
Or, add Docusign to your Agent Flow and from Connections area select New Connection option.
2. Enter your Docusign Account information:
Connection Name:
Give your connection a memorable name (e.g., "DocuSign-Connection").User ID:
You’ll need your DocuSign User ID.
Find your User ID in DocuSign’s Admin area by following this DocuSign Support Article.Authentication URL:
For production environments, use:
No Docusign Account?
On the connection page, click “Sign Up for Free” or visit create a free DocuSign account page to create your free account and then try UpBrains AI and DocuSign for free.
Click Connect.
You’ll be redirected to DocuSign to log in.
Important: Use an Admin account to grant UpBrains proper permissions for creating envelopes on your behalf.
Step 2: Choose and Configure DocuSign Actions
Once your connection is established, you can add DocuSign actions to your Agent Flow. As the first step, add Docusign to your Agent Flow. UpBrains supports a variety of actions:
Supported DocuSign Actions:
Create Envelope (from Template)
Add Attachment to Existing Envelope
Create Envelope (Direct, from Document)
Create Envelope and Template
Send Envelope
Get Document Fields
Update Envelope Form Fields
Custom DocuSign API Call
Example: Configuring “Create Envelope (Direct, from Document)”
This action lets you create and send an envelope with any document, without using a template.
Parameters:
Connection:
Select the DocuSign connection you created earlier.Document URL:
Provide the URL to the document to be signed. This can come from previous steps in your agent flow.Signer Email:
The recipient’s email address.Signer Name:
The name of the recipient.Envelope Status:
Choose one:Created – Creates a draft envelope in DocuSign (not sent). You can view and edit the envelop in Docusign and then send it manually.
Sent – Sends the envelope to the recipient immediately.
Add Signature Field:
Toggle ON to automatically place a signature field on the document.CC Info:
(Optional) Add email addresses to CC others on the envelope.Wait for Response:
Toggle ON to pause the agent flow until DocuSign notifies completion.Email Subject:
(Optional) Customize the email subject line for the envelope notification.
Step 3: Add Additional Steps (Optional)
After configuring your DocuSign step, you can extend your Agent Flow with additional AI-powered actions. For example:
Classify or extract data from the document before sending it for signature.
Automate follow-up steps after signature completion, such as sending signed documents to ERP, storing them in cloud storage, or extracting signed fields.
See the full list of available AI tools and actions here: Common Tools and Actions.
Example Agent Flow
Classify Incoming Document (AI Step)
Extract Key Data (AI Step)
Create Envelope (Direct, from Document) [DocuSign Action]
Wait for DocuSign Completion
Extract Signed Fields (AI Step or Docusign API)
Send to Internal System / Notify Team
Need More Help?
UpBrains AI makes it easy to automate your document signature workflows and more—with no code required!
Let me know if you need sample screenshots, video walkthroughs, or further customization for your specific use case!
Data Collections