Creating Your First Automation AI Agent
In UpBrains AI, you can create smart automation agents that automate repetitive, manual, or complex business workflows. For these agents, you will define the workflow of the agent to ensure the agent runs in a predictable manner every time it runs. These AI agents are designed using a combination of triggers and steps that define when they should activate and what they should do including powerful, native AI capabilities from UpBrains AI for operating on messages, files and other unstructured data.
🔷 Main Steps to Create an AI Agent in UpBrains AI
✅ Step 1: Access the Agent Builder
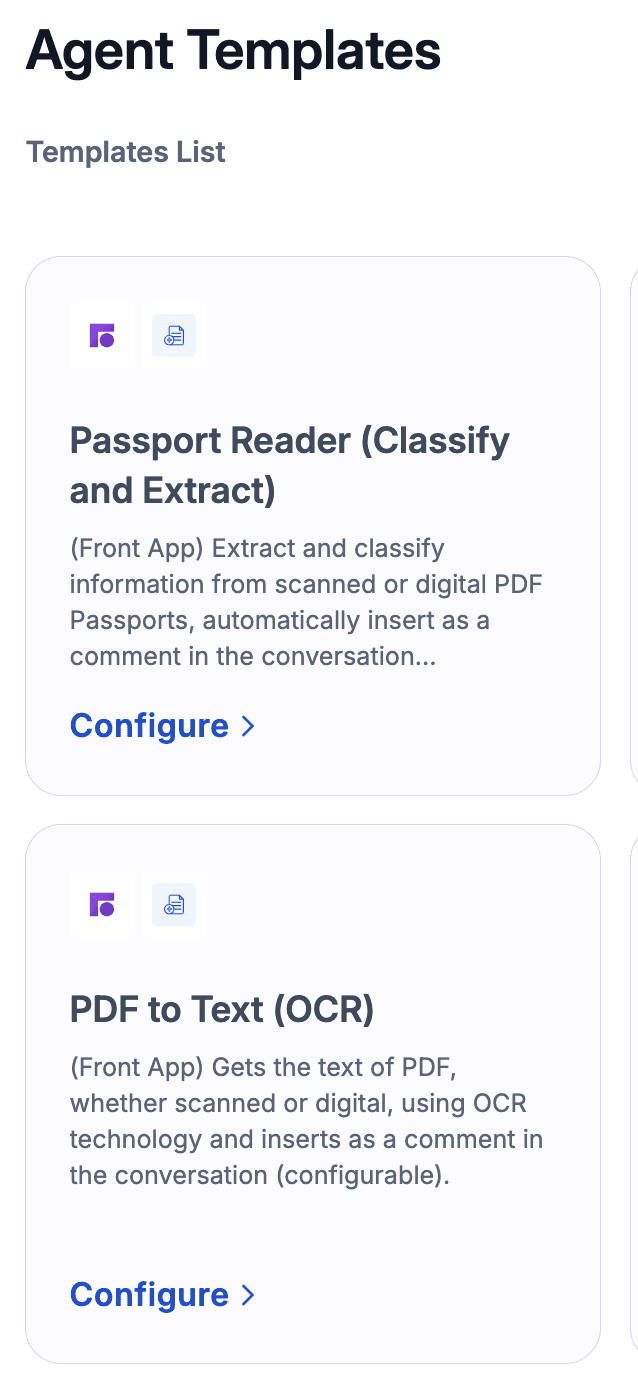
Log in to the UpBrains AI dashboard, and head to Admin Workspace (top left corner of the screen). From the left-hand sidebar, click on "Agents". You can choose to start from one of prebuilt AI Agent Templates or create an AI Agent from scratch using New Agent button. You will be taken to the Agent Builder which starts with a trigger.
✅ Step 2: Define the Trigger
The agent needs to know when to run. This is done by selecting a Trigger from the available options. Commonly used triggers include:
New message received (e.g., from Microsoft Outlook, Zendesk, or Front, etc.)
File uploaded
Scheduled time
Manual run (Webhook), which can be called by external services
👉 To configure a trigger:
Click on the trigger block.
Select the tool (e.g., Microsoft Outlook, or Webhook).
Choose the trigger type (e.g., "New Message").
Connect the tool account (OAuth or API key).
Define required parameters (e.g., inbox, filters, etc.).
✅ Step 3: Build Your Workflow (Flow)
After setting the trigger, define the sequence of actions your agent will perform.
👉 What is an Agent Flow?
An Agent Flow is a visual and logical sequence of steps that the AI agent will follow after being triggered. Think of it as a workflow made of building blocks — where each block represents a task like reading data, extracting information, calling an API, or sending a response.
👉 To add a step to the flow:
Click "+" in the Flow builder.
Choose the tool or agent (e.g., Microsoft Outlook, Front, Zendesk, or use a sub-agent).
Select the action type (e.g., Classify, Extract Info, Send Reply, Create Ticket, etc).
Configure parameters (e.g., mappings, template variables).
Optionally call another flow or sub-agent to modularize your automation.
See the list of Common Tools and Actions for more information on what actions and AI capabilities you can include in your agent flow.
✅ Step 4: Connect Steps Logically
You can chain steps together by linking the output of one step to the input of the next.
This builds a logical flow that mimics how a human would process information. In connecting the steps, you can use control elements and conditional elements as well:
Loop - a control element that allows you to iterate over a list or set of items such as attachments of an email,
Binary Choice – a control element that allows you to define a condition with a Yes / No outcome. The condition could consist of AND or OR statements between different conditions.
Router – a control element for defining multi-branch conditional routing. This element can be configured to run one or more branches that meet the conditions (evaluate to true).
Complex AI-powered decisions: Conditions could be defined using logical operations such as equality and containment, or be AI-powered. If you need to combine AI-powered decisions and logical expressions, you can use the Smart Classifier tool and action, which allow you to define conditions, and combine them using logical operators to define conditions for each class. The conditions could be AI-powered on natural language inputs.
✅ Step 5: Test
Test each step as you create the automation flow. The flow will be automatically saved.
Test Triggers: For every trigger, you can use the “Test Trigger” button in the Test Trigger area. To receive data to your trigger, you need to perform a triggering action such as sending an email to the inbox connected (See Connecting Microsoft Outlook, Connecting Front App or Connecting Zendesk), or calling the webhook with the desired payload, etc.
For some triggers, you need to create a trigger in third-party applications. For example, for Front App, you need to create a rule with a Send to Webhook action and activate it.
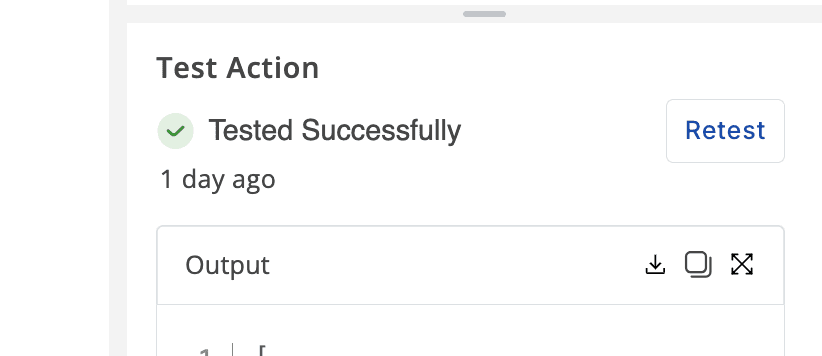
In the test response area, you can inspect the received payload by the trigger. You may click on X to expand the window, download the output or copy it into the clipboard, etc.
✅ Step 6: Publish the Agent
Once tested all steps and validated their outputs and actions, click "Publish" to activate / enable your AI agent.
🟨 Versioning Notes
Each automation agent has two versions:
Draft: Editable version for updates which you can continue to test.
Published: Live version used in production and served by the Live URL endpoint.
Every edit after a publication creates a new draft. Test in draft mode before publishing. If needed, you can switch or revert between versions safely.
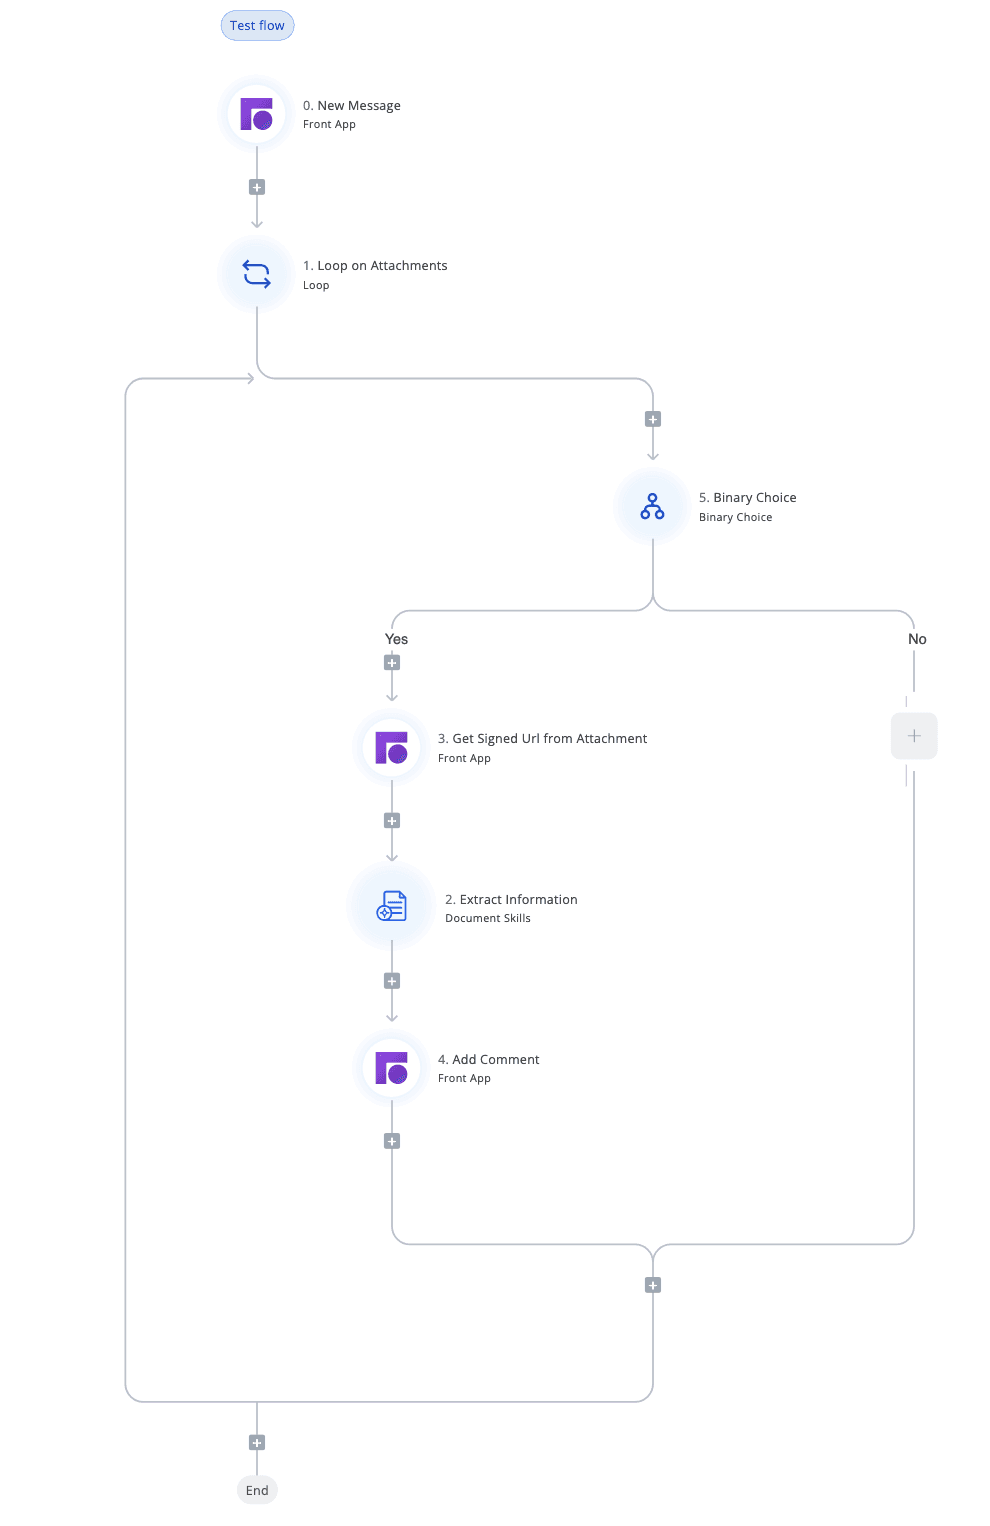
✉️ Example: Select one of the available AI Agent Templates and review the corresponding flows as a sample before starting to create your own. For example, you may choose the template called ‘PDF to Text (OCR)’ to see its agent flow.
The sample agent flow for PDF to Text (OCR) which extracts the text of a PDF attachment and adds it as a comment in Front App (triggered by arrival of a new email/message in a Front App inbox).
💡 Tips for Building Better Flows
Keep steps small and modular for reuse/debugging.
Clearly name steps and variables.
Use test files to validate edge cases.
Refer to built-in docs or contact support for API/connection help.
🛟 Need Help?
Look at prebuilt AI Agent Templates
Contact the UpBrains AI team — we’ll help you build and test your first agent end-to-end.
Creating Your First Automation AI Agent
In UpBrains AI, you can create smart automation agents that automate repetitive, manual, or complex business workflows. For these agents, you will define the workflow of the agent to ensure the agent runs in a predictable manner every time it runs. These AI agents are designed using a combination of triggers and steps that define when they should activate and what they should do including powerful, native AI capabilities from UpBrains AI for operating on messages, files and other unstructured data.
🔷 Main Steps to Create an AI Agent in UpBrains AI
✅ Step 1: Access the Agent Builder
Log in to the UpBrains AI dashboard, and head to Admin Workspace (top left corner of the screen). From the left-hand sidebar, click on "Agents". You can choose to start from one of prebuilt AI Agent Templates or create an AI Agent from scratch using New Agent button. You will be taken to the Agent Builder which starts with a trigger.
✅ Step 2: Define the Trigger
The agent needs to know when to run. This is done by selecting a Trigger from the available options. Commonly used triggers include:
New message received (e.g., from Microsoft Outlook, Zendesk, or Front, etc.)
File uploaded
Scheduled time
Manual run (Webhook), which can be called by external services
👉 To configure a trigger:
Click on the trigger block.
Select the tool (e.g., Microsoft Outlook, or Webhook).
Choose the trigger type (e.g., "New Message").
Connect the tool account (OAuth or API key).
Define required parameters (e.g., inbox, filters, etc.).
✅ Step 3: Build Your Workflow (Flow)
After setting the trigger, define the sequence of actions your agent will perform.
👉 What is an Agent Flow?
An Agent Flow is a visual and logical sequence of steps that the AI agent will follow after being triggered. Think of it as a workflow made of building blocks — where each block represents a task like reading data, extracting information, calling an API, or sending a response.
👉 To add a step to the flow:
Click "+" in the Flow builder.
Choose the tool or agent (e.g., Microsoft Outlook, Front, Zendesk, or use a sub-agent).
Select the action type (e.g., Classify, Extract Info, Send Reply, Create Ticket, etc).
Configure parameters (e.g., mappings, template variables).
Optionally call another flow or sub-agent to modularize your automation.
See the list of Common Tools and Actions for more information on what actions and AI capabilities you can include in your agent flow.
✅ Step 4: Connect Steps Logically
You can chain steps together by linking the output of one step to the input of the next.
This builds a logical flow that mimics how a human would process information. In connecting the steps, you can use control elements and conditional elements as well:
Loop - a control element that allows you to iterate over a list or set of items such as attachments of an email,
Binary Choice – a control element that allows you to define a condition with a Yes / No outcome. The condition could consist of AND or OR statements between different conditions.
Router – a control element for defining multi-branch conditional routing. This element can be configured to run one or more branches that meet the conditions (evaluate to true).
Complex AI-powered decisions: Conditions could be defined using logical operations such as equality and containment, or be AI-powered. If you need to combine AI-powered decisions and logical expressions, you can use the Smart Classifier tool and action, which allow you to define conditions, and combine them using logical operators to define conditions for each class. The conditions could be AI-powered on natural language inputs.
✅ Step 5: Test
Test each step as you create the automation flow. The flow will be automatically saved.
Test Triggers: For every trigger, you can use the “Test Trigger” button in the Test Trigger area. To receive data to your trigger, you need to perform a triggering action such as sending an email to the inbox connected (See Connecting Microsoft Outlook, Connecting Front App or Connecting Zendesk), or calling the webhook with the desired payload, etc.
For some triggers, you need to create a trigger in third-party applications. For example, for Front App, you need to create a rule with a Send to Webhook action and activate it.
In the test response area, you can inspect the received payload by the trigger. You may click on X to expand the window, download the output or copy it into the clipboard, etc.
✅ Step 6: Publish the Agent
Once tested all steps and validated their outputs and actions, click "Publish" to activate / enable your AI agent.
🟨 Versioning Notes
Each automation agent has two versions:
Draft: Editable version for updates which you can continue to test.
Published: Live version used in production and served by the Live URL endpoint.
Every edit after a publication creates a new draft. Test in draft mode before publishing. If needed, you can switch or revert between versions safely.
✉️ Example: Select one of the available AI Agent Templates and review the corresponding flows as a sample before starting to create your own. For example, you may choose the template called ‘PDF to Text (OCR)’ to see its agent flow.
The sample agent flow for PDF to Text (OCR) which extracts the text of a PDF attachment and adds it as a comment in Front App (triggered by arrival of a new email/message in a Front App inbox).
💡 Tips for Building Better Flows
Keep steps small and modular for reuse/debugging.
Clearly name steps and variables.
Use test files to validate edge cases.
Refer to built-in docs or contact support for API/connection help.
🛟 Need Help?
Look at prebuilt AI Agent Templates
Contact the UpBrains AI team — we’ll help you build and test your first agent end-to-end.
Common Tools and Actions