How to Build an AI Agent to Extract Text from PDF and Images
With UpBrains AI, you can automate the process of reading image and PDF attachments using a no-code drag-and-drop Agent Flow Builder. In this guide, we’ll walk through how to create an AI Agent that:
Extracts text from PDF and image attachments in emails
Optionally classifies the document (e.g., invoice, PO, certificate)
Enters the extracted content as internal comments in platforms like Front, Zendesk, or Salesforce Service Cloud
Let’s get started.
Step 1: Start with an AI Agent Flow
To begin, go to your UpBrains dashboard and click "Create AI Agent."
Select “Blank Flow” or start from a template if one matches your use case (there are predefined templates for extracting text from PDF and images, which you can start with). Different file attachment formats— PDF, JPEG, PNG, TIFF — are all supported.
Each AI Agent is built from a sequence of steps (also known as “actions”), configured visually in a drag-and-drop builder. These steps handle parsing, extraction, classification, and integration with external tools.
Refer to the Creating Your First AI Agent guide if you’re new to the Flow Builder interface.
Step 2: Ingest the Email and Parse Attachments in the Trigger
The Agent Flow Trigger is the step that receives the contents of incoming emails (as a JSON object), including body text and attachments.
Step 3 (Optional): Classify the Document
If you desired to process only specific files, then add a step to your agent flow called “Classify Attachment”. This AI-powered action uses natural language and visual context to assign document types (e.g., Purchase Order, Certificate of Analysis, Invoice). You can use this to add conditional branching to your flow based on the document type.
For example:
If it’s an invoice, get the text and route to Accounts Payable
If it’s a Certificate of Analysis, update product quality logs
If it’s unknown, leave untouched or add a tag for manual review
Classification models work out of the box and you need to only provide a name and a description for each of your desired classes.
Step 4: Extract Text with “Information Extraction” Action
Drag in the “Information Extraction” step and connect it after the email parser or document classifier.
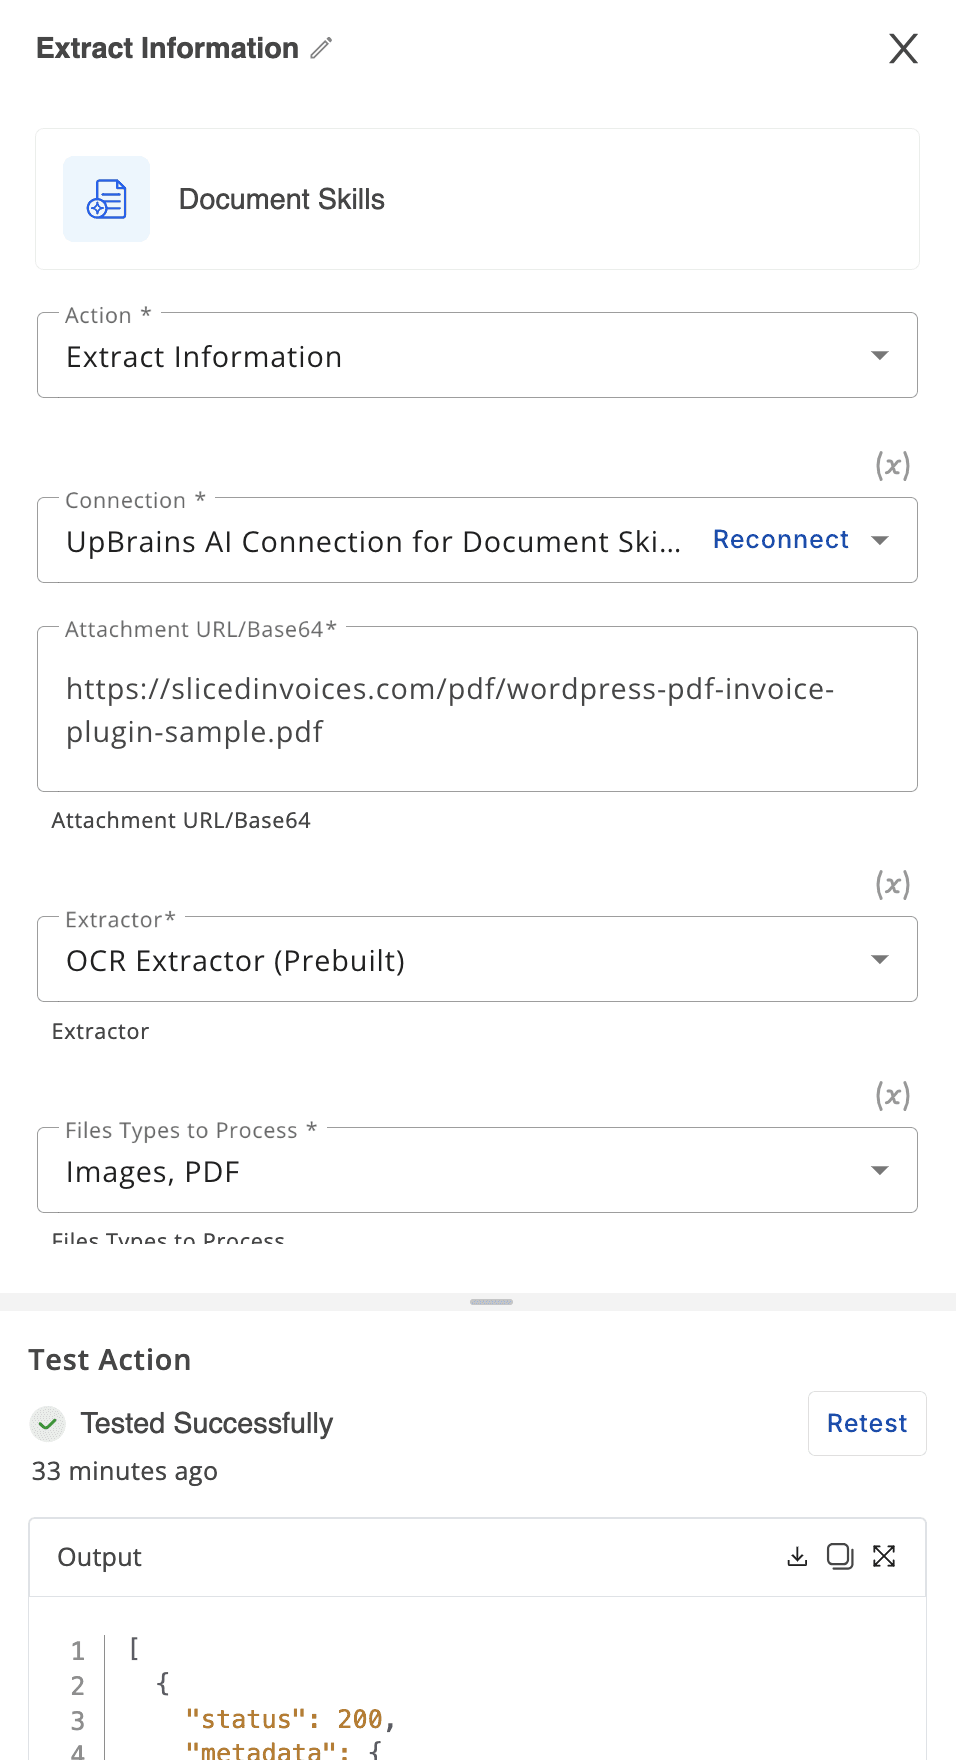
To configure this step:
Choose the default connection (called UpBrains AI Connection for Document Skills)
Set the attachment URL (from the trigger. Note that in some cases you may need to create a Signed URL, for example for Front App attachments and Microsoft Outlook, if there is a need for including credentials in the link as extractors do not deal with credential information).
Choose "OCR Extractor (Prebuilt)" as the value of Extractor.
Choose file types that you need to be processed (PDF, Images, etc).
Specify pages if you would like to limit the number of pages processed (e.g., enter value 1 to process only the first page).
This step automatically handles multi-page files up to 50 pages and supports AI-assisted correction of noisy inputs and image quality enhancement, rotation, etc.
Step 5: Enter Extracted Text into External Tools
Now that the output of the previous step is a JSON object that contains the text of the file both page by page as well as in one element (called 'content'). Once you have the text, you feed it to follow-on steps that syncs it to your preferred tool:
Use the “Post Comment to Front”, “Add Internal Note in Zendesk”, or “Log Note in Salesforce Service Cloud” step depending on where your support or operations team works.
You can format the output using dynamic variables, such as (as a previous step using 'Concatenate' actions from Text Helper tool):
You can also include a link to the original email or document, if needed.
Step 6: Test and Deploy
Once all steps are in place:
Review the flow for logic, test every step and output formatting
Hit Publish when you are ready
The Agent will now run on incoming emails, extract document text, and automatically post relevant comments into your downstream tools—no manual intervention required.
Example Use Case in Action
Imagine your customer service inbox receives a PDF with a handwritten Certificate of Analysis from a supplier. The AI Agent will:
Detect the attachment
Classify it as a Certificate of Analysis
Extract the text, including product lot, specs, and measurements
Post it as a comment in the linked Zendesk ticket
Alert your quality team if thresholds are violated
The result? Faster response times, better data capture, and fewer human errors.
Need Help?
For more detail on specific actions, visit the Common Tools and Actions reference.
Need help setting up your agent? Reach out to us or explore our templates for document intake and classification.
How to Build an AI Agent to Extract Text from PDF and Images
With UpBrains AI, you can automate the process of reading image and PDF attachments using a no-code drag-and-drop Agent Flow Builder. In this guide, we’ll walk through how to create an AI Agent that:
Extracts text from PDF and image attachments in emails
Optionally classifies the document (e.g., invoice, PO, certificate)
Enters the extracted content as internal comments in platforms like Front, Zendesk, or Salesforce Service Cloud
Let’s get started.
Step 1: Start with an AI Agent Flow
To begin, go to your UpBrains dashboard and click "Create AI Agent."
Select “Blank Flow” or start from a template if one matches your use case (there are predefined templates for extracting text from PDF and images, which you can start with). Different file attachment formats— PDF, JPEG, PNG, TIFF — are all supported.
Each AI Agent is built from a sequence of steps (also known as “actions”), configured visually in a drag-and-drop builder. These steps handle parsing, extraction, classification, and integration with external tools.
Refer to the Creating Your First AI Agent guide if you’re new to the Flow Builder interface.
Step 2: Ingest the Email and Parse Attachments in the Trigger
The Agent Flow Trigger is the step that receives the contents of incoming emails (as a JSON object), including body text and attachments.
Step 3 (Optional): Classify the Document
If you desired to process only specific files, then add a step to your agent flow called “Classify Attachment”. This AI-powered action uses natural language and visual context to assign document types (e.g., Purchase Order, Certificate of Analysis, Invoice). You can use this to add conditional branching to your flow based on the document type.
For example:
If it’s an invoice, get the text and route to Accounts Payable
If it’s a Certificate of Analysis, update product quality logs
If it’s unknown, leave untouched or add a tag for manual review
Classification models work out of the box and you need to only provide a name and a description for each of your desired classes.
Step 4: Extract Text with “Information Extraction” Action
Drag in the “Information Extraction” step and connect it after the email parser or document classifier.
To configure this step:
Choose the default connection (called UpBrains AI Connection for Document Skills)
Set the attachment URL (from the trigger. Note that in some cases you may need to create a Signed URL, for example for Front App attachments and Microsoft Outlook, if there is a need for including credentials in the link as extractors do not deal with credential information).
Choose "OCR Extractor (Prebuilt)" as the value of Extractor.
Choose file types that you need to be processed (PDF, Images, etc).
Specify pages if you would like to limit the number of pages processed (e.g., enter value 1 to process only the first page).
This step automatically handles multi-page files up to 50 pages and supports AI-assisted correction of noisy inputs and image quality enhancement, rotation, etc.
Step 5: Enter Extracted Text into External Tools
Now that the output of the previous step is a JSON object that contains the text of the file both page by page as well as in one element (called 'content'). Once you have the text, you feed it to follow-on steps that syncs it to your preferred tool:
Use the “Post Comment to Front”, “Add Internal Note in Zendesk”, or “Log Note in Salesforce Service Cloud” step depending on where your support or operations team works.
You can format the output using dynamic variables, such as (as a previous step using 'Concatenate' actions from Text Helper tool):
You can also include a link to the original email or document, if needed.
Step 6: Test and Deploy
Once all steps are in place:
Review the flow for logic, test every step and output formatting
Hit Publish when you are ready
The Agent will now run on incoming emails, extract document text, and automatically post relevant comments into your downstream tools—no manual intervention required.
Example Use Case in Action
Imagine your customer service inbox receives a PDF with a handwritten Certificate of Analysis from a supplier. The AI Agent will:
Detect the attachment
Classify it as a Certificate of Analysis
Extract the text, including product lot, specs, and measurements
Post it as a comment in the linked Zendesk ticket
Alert your quality team if thresholds are violated
The result? Faster response times, better data capture, and fewer human errors.
Need Help?
For more detail on specific actions, visit the Common Tools and Actions reference.
Need help setting up your agent? Reach out to us or explore our templates for document intake and classification.
Extracting Structured Data