🎯 Guide to Connecting Front with UpBrains AI
With the Front App Trigger, your team can instantly automate actions like ticket classification, attachment extraction, and intelligent routing—right when messages arrive in your shared inboxes.
You can get started by choosing one of Front App's Agent Templates to continue this guide.
🔧 Prerequisites
Requirement | Purpose |
|---|---|
A Front workspace with admin rights | To create webhook rules and manage integrations |
An UpBrains AI account with permission to create Agent Flows | To connect and automate the flow |
🔵 Step 1: Select the Trigger
In your UpBrains AI dashboard:
Open or create an Agent Flow.
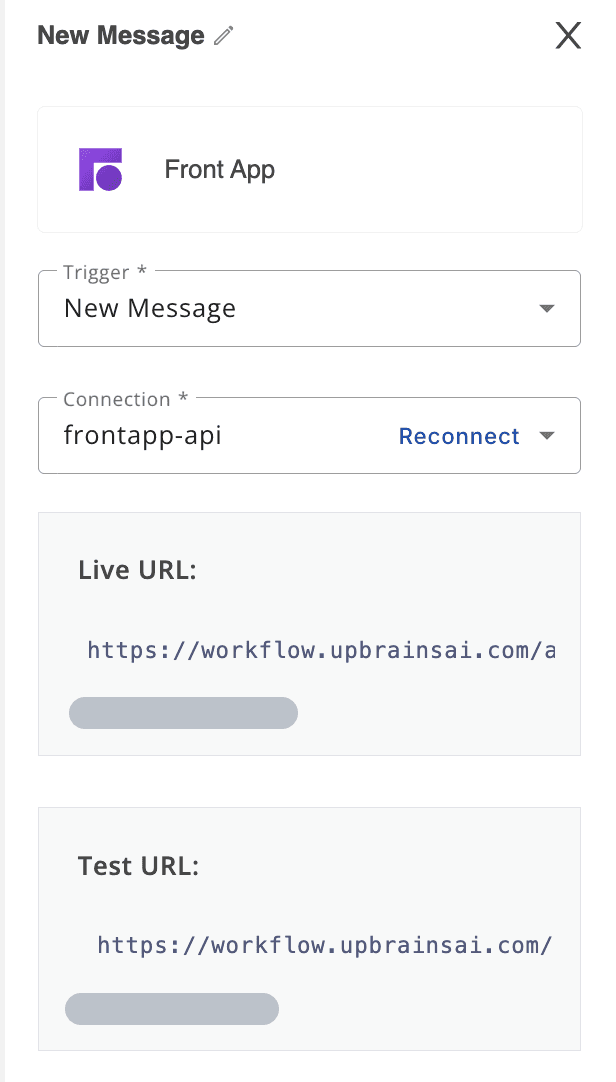
Select the flow Trigger → Choose Front App from the right-hand side panel.
Select New Message as the event.

🔁 Why "New Message"?
This trigger activates whenever a new conversation or reply is received in a Front inbox—ideal for real-time customer support workflows.
🔐 Step 2: Connect to Front
Click Connections → New Connection, and choose one of the authentication types:
Option A – OAuth 2.0 Authentication
Select "OAuth 2.0".
Log in to your Front account (or SSO).
Authorize the required scopes.
Choose your workspace and save.
✅ Recommended for ease and security – no token management required. Note: this option ONLY allows access to shared resources. An AI Agent may get 403 (permission error) when accessing non-shared resources.
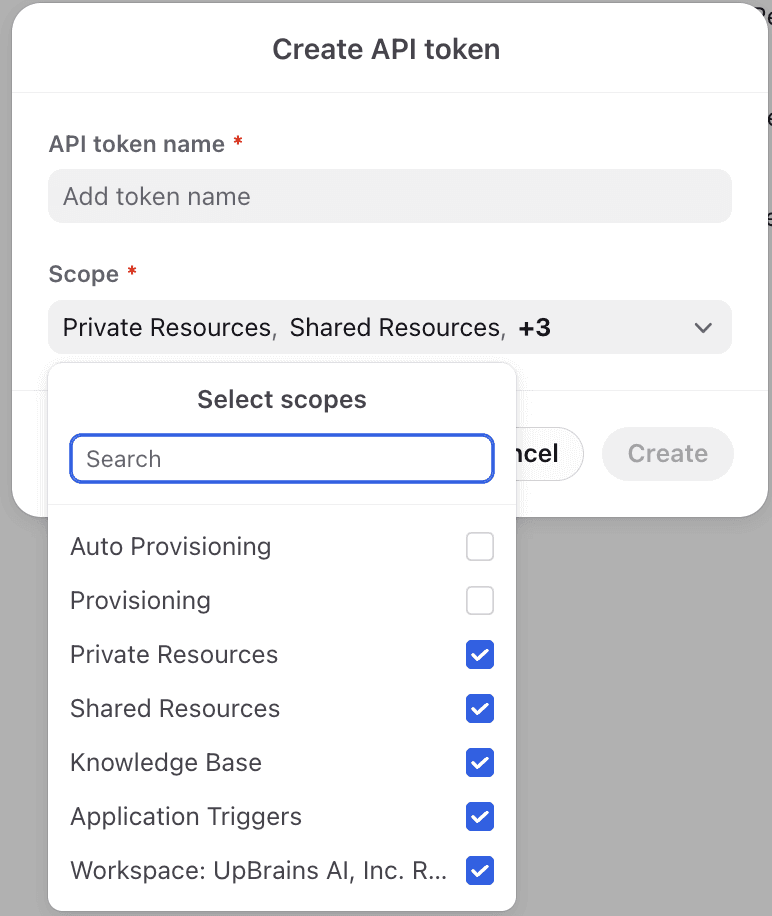
Option B – API Token
Go to Setting -> Company -> Under Integrations select Developers
On the middle panel, select API Token.
Follow Front’s API Token Guide.
Ensure to select the appropriate permission to both shared and personal resources, all applicable workspaces.
Paste your token and name the connection.
Save the connection.
🔒 Use this if your org restricts OAuth or you want fine-grained permission control, or if you want to provide the AI agent access to emails in personal inboxes (e.g., if your team may forward emails from their personal inbox to the shared inbox).
📥 Step 3: Select Inboxes
In the trigger configuration, choose which Front inboxes will trigger this Agent. The dropdown will list all available inboxes from your Front workspace.
🌐 Step 4: Create a Webhook Rule in Front
Go to Front Settings → Rules → Add Rule.
Under WHEN, select:
✅ Message is receivedAdd filters as needed:
Inbox → e.g., “Support”
Attachments → “present” (optional)
Under THEN, choose:
Action: Send to a Webhook
Paste the Test Webhook URL from your Webhook of the Agent Flow you are designing at UpBrains AI
📘 Need help? Front's guide to webhooks
🧪 Step 5: Test the Trigger
In UpBrains AI, from the Trigger, select Test Trigger. The trigger will switch to the test mode and will be listening for an event from Front App.
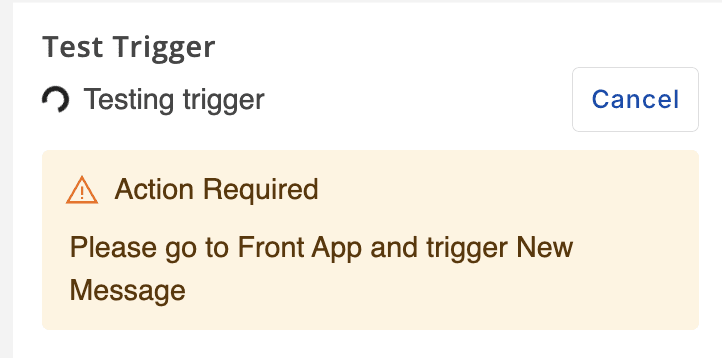
Send a test email to the selected inbox in Front. It should trigger the rule that you have created to send the email payload to your UpBrains AI's Agent.
Wait up to 30 seconds. You should see:
Email body
Metadata (sender, subject, tags)
Attachments (if any)
You should see a success message, and should be able to use the event payload in your agent flow to process the email information.

If the event doesn't appear:
Check rule filters and activation.
Ensure webhook URL is correct.
Verify permissions of your API token or OAuth scopes.
🤖 Step 6: Build & Validate Your Flow
Use the email payload from Front to build your automation. You may start from one of available Agent Templates with a Front Trigger. Alternatively, you can build your own custom agent flow. Visit How to Create your First AI Agent guide for more information. In a custom agent flow, you can:
Use AI steps like:
📄 Document OCR
🧠 OpenAI for intent or summarization
📊 Data extractors
Test each step with real data using Test Step.
Once all steps work correctly, Publish the Agent.
Consule on the guides on Create your First AI Agent and Common Tools and Actions for more information on how to build and configure your agent flow, and the guide on extractors:
Processing Message Attachments
The best practice for processing attachments of an email is use a Loop element to process all attachments of an email:
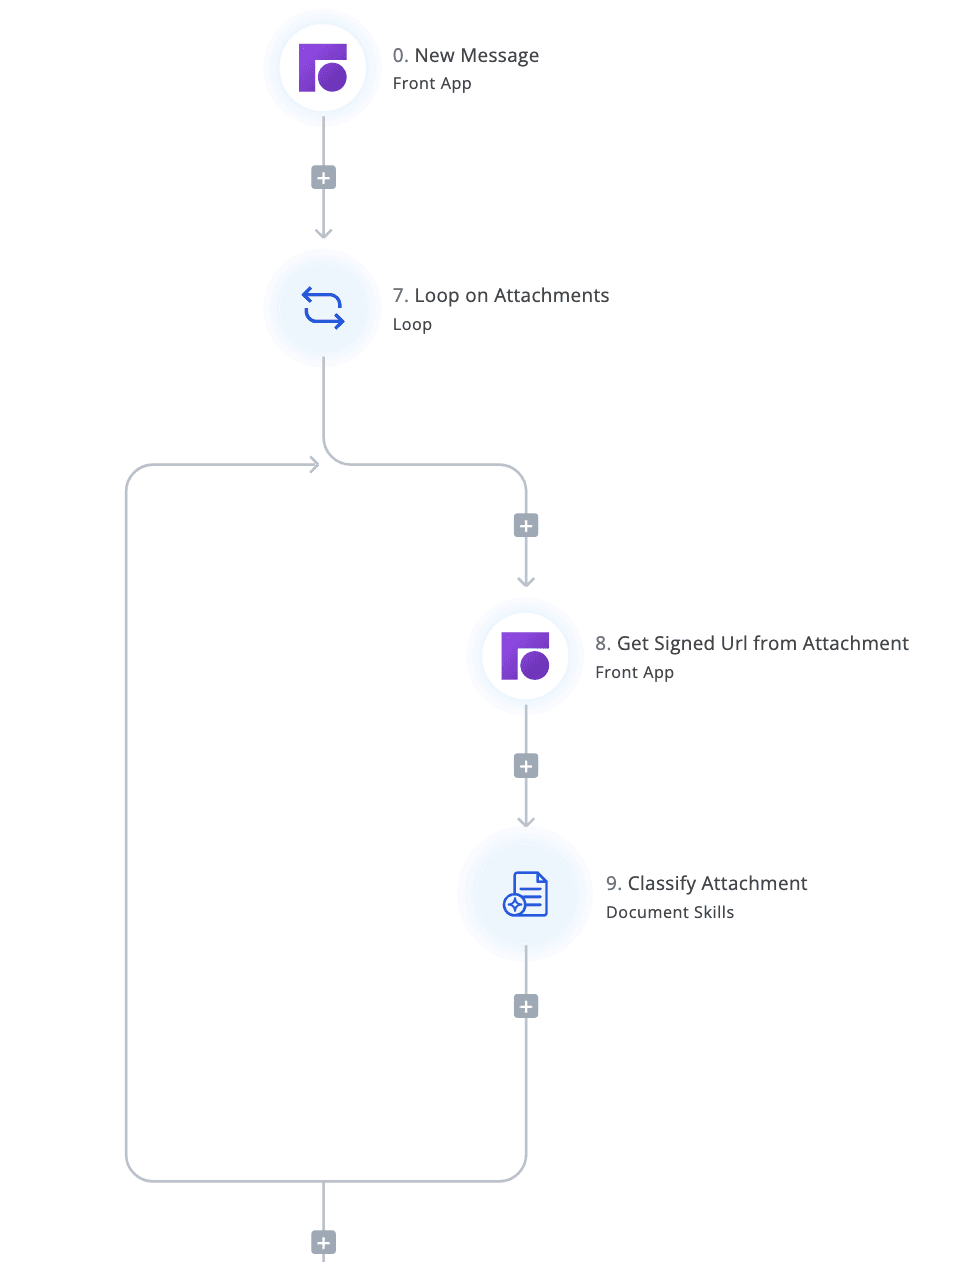
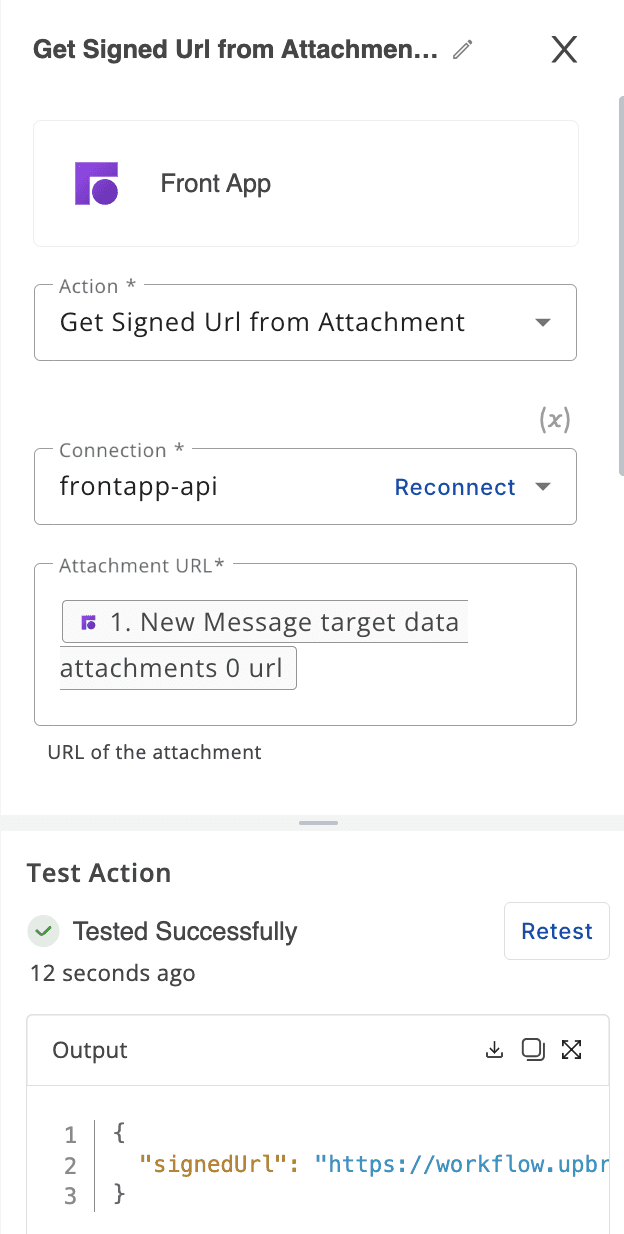
Creating Signed URLs for Attachments
The attachment links that are included in the trigger need an access token to download and process the attached file. On the other hand, next steps in the agent flow that process files (e.g., Classify Attachment or Extract Information from Document Skills tool) need URLs of the files to be accessible without needing to deal with credentials.
The solution is to use an action called “Get Signed URL from Attachment” action from the Front App tool. This action will get the attachment URL (the ‘url’ of the attachment object) and the associated File Name and build a signedURL. This signed URL can be fed to the File URL field of the next steps in the agent flow to process the attachment.
Note: if you use a Loop over attachment (like the example above, then you have to set the URL from the items in the loop to the Attachment URL in this action.
🚀 Step 7: Go Live
Copy the Live Webhook URL from the Trigger sidebar.
Return to Front → Edit your Rule.
Replace the Test URL with the Live URL and save.
🎉 Done! Your Front inbox is now integrated with UpBrains AI.
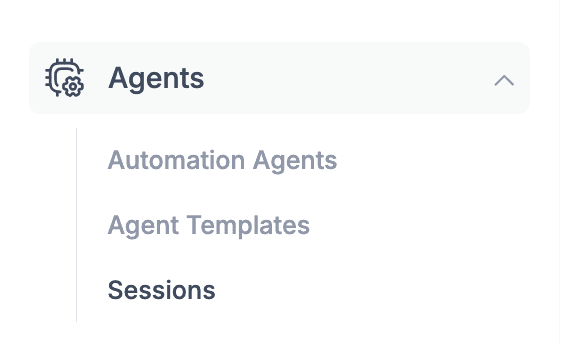
To test your live settings, now create an event (sending an email to the inbox connected to UpBrains AI) that meets the trigger conditions. To ensure this works correctly, in the Admin Workspace under Agents click on Sessions. You should see a list of the latest agent runs (based on your Front rule’s triggers) and their status. If you click on any of the agent run records, you should be able to see the execution details of your agent automation flow and the status of each step. If they are processed successfully, you are done! Congratulations!
✅ Summary of Options
Option | Description |
|---|---|
Trigger | New Message (Front App) |
Authentication Types | OAuth 2.0 or API Token |
Inbox Selection | Multi-select dropdown |
Webhook URLs | Auto-generated Test & Live URLs |
Advanced Filtering | Set via Front rules (e.g., attachments, tags) |
🌟 Best Practices
Start small: Begin with a low-volume inbox for testing.
Use Tags: Front tags are passed via the webhook and can guide agent behavior.
Monitor Agent Runs: Use the Agent Sessions dashboard to trace every run.
Secure API Tokens: Rotate and audit regularly.
🔜 Next Steps
Add steps for classification, extraction, or updates to CRMs.
Add “Send Reply” logic to auto-draft responses post-processing.
Expand to other inboxes or use more advanced conditions.
🧩 Need help?
Reach out via the Contact Us form in UpBrains AI or Book a Demo for tailored onboarding.
🎯 Guide to Connecting Front with UpBrains AI
With the Front App Trigger, your team can instantly automate actions like ticket classification, attachment extraction, and intelligent routing—right when messages arrive in your shared inboxes.
You can get started by choosing one of Front App's Agent Templates to continue this guide.
🔧 Prerequisites
Requirement | Purpose |
|---|---|
A Front workspace with admin rights | To create webhook rules and manage integrations |
An UpBrains AI account with permission to create Agent Flows | To connect and automate the flow |
🔵 Step 1: Select the Trigger
In your UpBrains AI dashboard:
Open or create an Agent Flow.
Select the flow Trigger → Choose Front App from the right-hand side panel.
Select New Message as the event.
🔁 Why "New Message"?
This trigger activates whenever a new conversation or reply is received in a Front inbox—ideal for real-time customer support workflows.
🔐 Step 2: Connect to Front
Click Connections → New Connection, and choose one of the authentication types:
Option A – OAuth 2.0 Authentication
Select "OAuth 2.0".
Log in to your Front account (or SSO).
Authorize the required scopes.
Choose your workspace and save.
✅ Recommended for ease and security – no token management required. Note: this option ONLY allows access to shared resources. An AI Agent may get 403 (permission error) when accessing non-shared resources.
Option B – API Token
Go to Setting -> Company -> Under Integrations select Developers
On the middle panel, select API Token.
Follow Front’s API Token Guide.
Ensure to select the appropriate permission to both shared and personal resources, all applicable workspaces.
Paste your token and name the connection.
Save the connection.
🔒 Use this if your org restricts OAuth or you want fine-grained permission control, or if you want to provide the AI agent access to emails in personal inboxes (e.g., if your team may forward emails from their personal inbox to the shared inbox).
📥 Step 3: Select Inboxes
In the trigger configuration, choose which Front inboxes will trigger this Agent. The dropdown will list all available inboxes from your Front workspace.
🌐 Step 4: Create a Webhook Rule in Front
Go to Front Settings → Rules → Add Rule.
Under WHEN, select:
✅ Message is receivedAdd filters as needed:
Inbox → e.g., “Support”
Attachments → “present” (optional)
Under THEN, choose:
Action: Send to a Webhook
Paste the Test Webhook URL from your Webhook of the Agent Flow you are designing at UpBrains AI
📘 Need help? Front's guide to webhooks
🧪 Step 5: Test the Trigger
In UpBrains AI, from the Trigger, select Test Trigger. The trigger will switch to the test mode and will be listening for an event from Front App.
Send a test email to the selected inbox in Front. It should trigger the rule that you have created to send the email payload to your UpBrains AI's Agent.
Wait up to 30 seconds. You should see:
Email body
Metadata (sender, subject, tags)
Attachments (if any)
You should see a success message, and should be able to use the event payload in your agent flow to process the email information.
If the event doesn't appear:
Check rule filters and activation.
Ensure webhook URL is correct.
Verify permissions of your API token or OAuth scopes.
🤖 Step 6: Build & Validate Your Flow
Use the email payload from Front to build your automation. You may start from one of available Agent Templates with a Front Trigger. Alternatively, you can build your own custom agent flow. Visit How to Create your First AI Agent guide for more information. In a custom agent flow, you can:
Use AI steps like:
📄 Document OCR
🧠 OpenAI for intent or summarization
📊 Data extractors
Test each step with real data using Test Step.
Once all steps work correctly, Publish the Agent.
Consule on the guides on Create your First AI Agent and Common Tools and Actions for more information on how to build and configure your agent flow, and the guide on extractors:
Processing Message Attachments
The best practice for processing attachments of an email is use a Loop element to process all attachments of an email:
Creating Signed URLs for Attachments
The attachment links that are included in the trigger need an access token to download and process the attached file. On the other hand, next steps in the agent flow that process files (e.g., Classify Attachment or Extract Information from Document Skills tool) need URLs of the files to be accessible without needing to deal with credentials.
The solution is to use an action called “Get Signed URL from Attachment” action from the Front App tool. This action will get the attachment URL (the ‘url’ of the attachment object) and the associated File Name and build a signedURL. This signed URL can be fed to the File URL field of the next steps in the agent flow to process the attachment.
Note: if you use a Loop over attachment (like the example above, then you have to set the URL from the items in the loop to the Attachment URL in this action.
🚀 Step 7: Go Live
Copy the Live Webhook URL from the Trigger sidebar.
Return to Front → Edit your Rule.
Replace the Test URL with the Live URL and save.
🎉 Done! Your Front inbox is now integrated with UpBrains AI.
To test your live settings, now create an event (sending an email to the inbox connected to UpBrains AI) that meets the trigger conditions. To ensure this works correctly, in the Admin Workspace under Agents click on Sessions. You should see a list of the latest agent runs (based on your Front rule’s triggers) and their status. If you click on any of the agent run records, you should be able to see the execution details of your agent automation flow and the status of each step. If they are processed successfully, you are done! Congratulations!
✅ Summary of Options
Option | Description |
|---|---|
Trigger | New Message (Front App) |
Authentication Types | OAuth 2.0 or API Token |
Inbox Selection | Multi-select dropdown |
Webhook URLs | Auto-generated Test & Live URLs |
Advanced Filtering | Set via Front rules (e.g., attachments, tags) |
🌟 Best Practices
Start small: Begin with a low-volume inbox for testing.
Use Tags: Front tags are passed via the webhook and can guide agent behavior.
Monitor Agent Runs: Use the Agent Sessions dashboard to trace every run.
Secure API Tokens: Rotate and audit regularly.
🔜 Next Steps
Add steps for classification, extraction, or updates to CRMs.
Add “Send Reply” logic to auto-draft responses post-processing.
Expand to other inboxes or use more advanced conditions.
🧩 Need help?
Reach out via the Contact Us form in UpBrains AI or Book a Demo for tailored onboarding.
Connecting Zendesk